Hexo + NexT(或Fluid)主题美化技巧

本文最后更新于:2023年10月6日 晚上

Hexo + NexT(或Fluid)主题美化技巧

1. 网站界面

(1)更改网站底部年份和版权信息之间的图标(NexT,Fluid)

  在NexT主题配置文件中找到Footer Settings修改配置项如下:

1
2
3
4
5
6
7
8
9
10
11
12
footer:
# Specify the year when the site was setup. If not defined, current year will be used.
#since: 2021

# Icon between year and copyright info.
icon:
# Icon name in Font Awesome. See: https://fontawesome.com/icons
name: fa fa-paw # 狗爪paw
# If you want to animate the icon, set it to true.
animated: true # 动画显示
# Change the color of icon, using Hex Code.
color: "#000000" # 图标颜色

   在Fluid主题配置文件中查找Footer 修改相关配置。

(2)更改网站图标(NexT,Fluid)

  在\blog\source目录下创建资源管理的文件夹,例如\blog\source\uploads,将4份文件放入用户网站图标资源文件夹中\blog\source\uploads\user-favicons\1,并根据图片路径更改主题配置文件中的Favicon选项,更改内容如下:

1
2
3
4
5
6
favicon:
small: /uploads/user-favicons/1/favicon-16x16.png
medium: /uploads/user-favicons/1/favicon-32x32.png
apple_touch_icon: /uploads/user-favicons/1/apple-touch-icon.png
safari_pinned_tab: /uploads/user-favicons/1/logo.svg
#android_manifest: /manifest.json

  创建网站图标可以在Favicon Generator网站上传SVG文件,可获得网站图标文件包,含有各种尺寸的png图片。

  在Fluid主题配置文件中查找Favicon修改图标路径如下,若无所示文件夹则在\source中创建:

1
2
3
# 用于浏览器标签的图标
# Icon for browser tab
favicon: /img/favicon.png

(3)更改网站作者头像(NexT,Fluid)

  在目录下创建资源管理的文件夹,例如\blog\source\uploads,将头像文件(常用图片格式)放入用户头像资源文件夹中\blog\source\uploads\user-avatars,并根据图片路径更改主题配置文件中的avatar选项,更改内容如下:

1
2
3
4
5
6
7
avatar:
# Replace the default image and set the url here.
url: /uploads/user-avatars/boy-blue.svg
# If true, the avatar will be displayed in circle.
rounded: true
# If true, the avatar will be rotated with the cursor.
rotated: false

  在主题配置文件_config.fluid.yml中查找avatar设置,位于About页的头像,修改图片路径,若无所示文件夹则在\source中创建:

1
2
3
4
5
6
7
8
9
10
11
12
13
14
15
16
17
18
19
#---------------------------
# 关于页
# About Page
#---------------------------
about:
enable: true
banner_img: /img/default.png
banner_img_height: 60
banner_mask_alpha: 0.3
subtitle:
avatar: /img/avatar.png
name: "Leia"
intro: "技术博客,分享知识!"
# 更多图标可从 https://hexo.fluid-dev.com/docs/icon/ 查找,`class` 代表图标的 css class,添加 `qrcode` 后,图标不再是链接而是悬浮二维码
# More icons can be found from https://hexo.fluid-dev.com/docs/en/icon/ `class` is the css class of the icon. If adding `qrcode`, The icon is no longer a link, but a hovering QR code
icons:
- { class: "iconfont icon-github-fill", link: "https://github.com", tip: "GitHub" }
- { class: "iconfont icon-douban-fill", link: "https://douban.com", tip: "豆瓣" }
- { class: "iconfont icon-wechat-fill", qrcode: "/img/favicon.png" }

(4)给文章添加访问密码(NexT)

  在\source目录下的_data文件夹(若无此文件夹则创建)中创建head.njk文件,在主题配置文件中查找custom_file_path选项,取消相应文件的注释。head.njk添加如下内容:

1
2
3
4
5
6
7
8
9
10
<script>
(function(){
if('{{ page.password }}'){
if(prompt('请输入文章密码') !== '{{ page.password }}'){
alert('密码错误!');
history.back();
}
}
})();
</script>

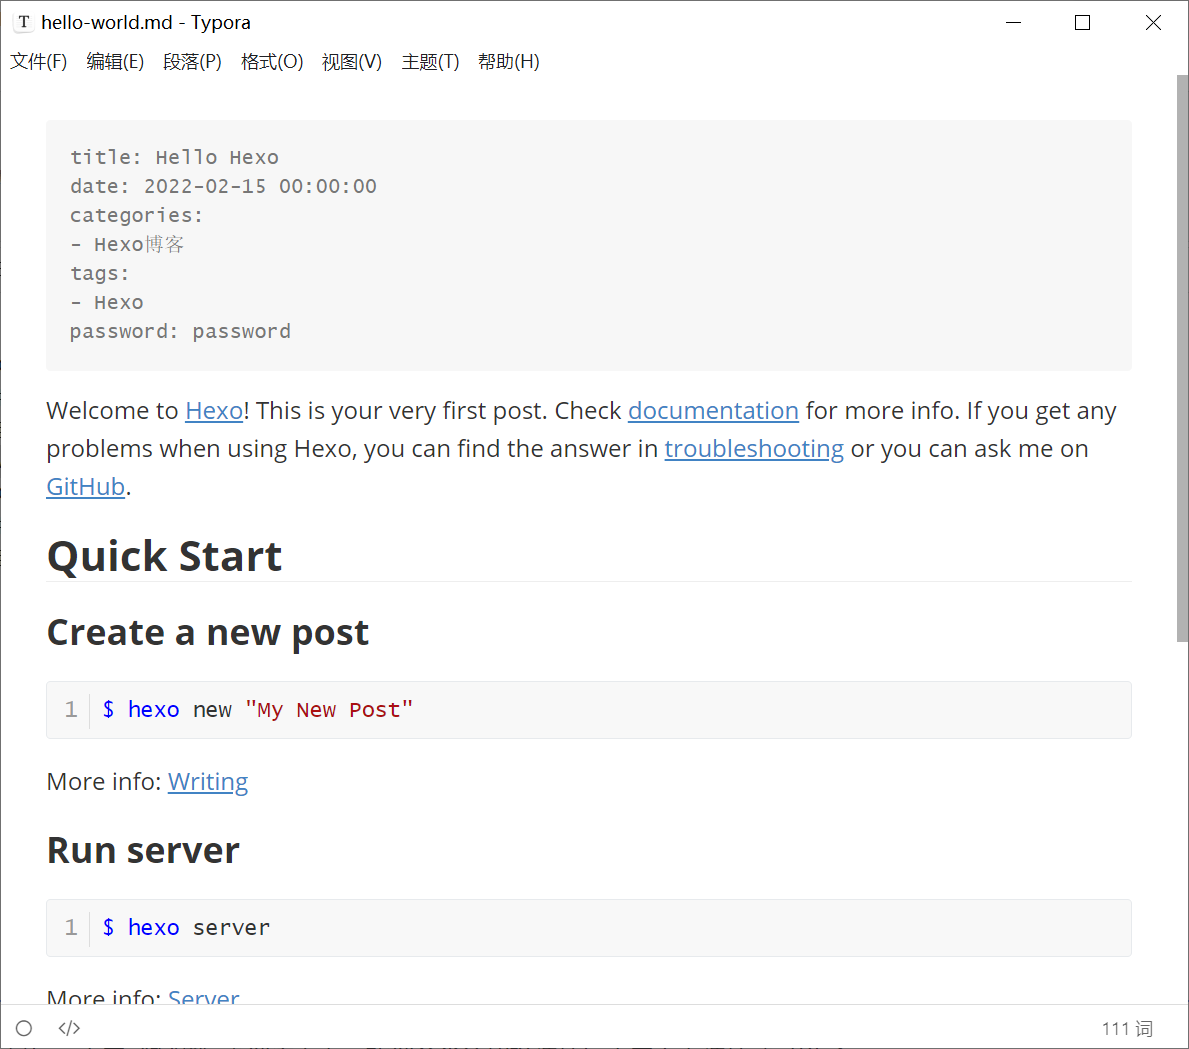
  在创建的文章顶部的配置选项中添加password字段用于设置文章访问密码,例如:

文章头部添加密码字段

(5)去除NexT主题下博客网站顶部的黑色宽线条(NexT)

  在\blog\source目录下的_data文件夹(若无此文件夹则创建)中创建styles.sty文件,在主题配置文件中查找custom_file_path选项,取消相应文件的注释。styles.sty添加如下内容:

1
2
//去掉顶部黑线:
.headband {display:none;}

(6)添加站内搜索功能(NexT,Fluid)

  安装hexo-generator-search

1
npm install hexo-generator-search --save

  安装 hexo-generator-searchdb

1
npm install hexo-generator-searchdb --save

  编辑主题配置文件,查找local_search设置enabletrue,内容如下:

1
2
3
4
5
6
7
8
9
10
11
12
13
# Local Search
# Dependencies: https://github.com/next-theme/hexo-generator-searchdb
local_search:
enable: true
# If auto, trigger search by changing input.
# If manual, trigger search by pressing enter key or search button.
trigger: auto
# Show top n results per article, show all results by setting to -1
top_n_per_article: 1
# Unescape html strings to the readable one.
unescape: false
# Preload the search data when the page loads.
preload: false

  Fluid主题的站内搜索设置与上述步骤类似。

(7)添加文章访问数统计,利用LeanCloud平台(Fluid)

  注册LeanCloud账号,创建应用并进入设置,在存储选项中创建Class,名称只能为Counter,设置数据条目的默认为无限制,成功创建Class。进入平台的设置项页面查看app_idapp_key的值,并将其填入主题配置文件中的leancloud_visitors设置项,并关闭security,内容如下:

1
2
3
4
5
6
7
8
9
10
11
12
# Show number of visitors of each article.
# You can visit https://www.leancloud.cn to get AppID and AppKey.
leancloud_visitors:
enable: true
app_id: fgaUlM9tpzalN2J6sOooSVc0-gzGzoHszcz
app_key: LUzOsNy6KL0b2iyCMMlIstrJcz
# Required for apps from CN region
server_url: # <your server url>
# Dependencies: https://github.com/theme-next/hexo-leancloud-counter-security
# If you don't care about security in leancloud counter and just want to use it directly
# (without hexo-leancloud-counter-security plugin), set `security` to `false`.
security: false

  在LeanCloud平台中设置Web安全域名,进入平台设置页面-应用安全中心,填入博客网站的地址。

  为防止访问记录被随意篡改,进入云引擎 -> 部署 -> 在线编辑中,在弹出窗口选择Hook类型,在选择 Hook处选择beforeUpdate,在选择 Class处选择Counter类。粘贴下方代码后,点保存。

1
2
3
4
5
6
7
8
var query = new AV.Query("Counter");
if (request.object.updatedKeys.indexOf('time') !== -1) {
return query.get(request.object.id).then(function (obj) {
if (obj.get("time") + 1 !== request.object.get("time")) {
throw new AV.Cloud.Error('Invalid update!');
}
})
}

  然后单击创建按钮右侧的部署 -> 生产环境 -> 部署,待显示部署完成:1 个实例部署成功即可。在主题配置文件_config.fluid.yml中查找网页访问统计,并设置LeanCloud的访问密钥:

1
2
3
4
5
6
7
8
9
10
11
12
13
14
15
16
17
18
# 网页访问统计
# Analysis of website visitors
web_analytics: # 网页访问统计
enable: true
# LeanCloud 计数统计,可用于 PV UV 展示,如果 `web_analytics: enable` 没有开启,PV UV 展示只会查询不会增加
# LeanCloud count statistics, which can be used for PV UV display. If `web_analytics: enable` is false, PV UV display will only query and not increase
leancloud:
app_id: xxxxxxxxxxxxxx
app_key: xxxxxxxxxxxxxx
# REST API 服务器地址,国际版不填
# Only the Chinese mainland users need to set
server_url:
# 统计页面时获取路径的属性
# Get the attribute of the page path during statistics
path: window.location.pathname
# 开启后不统计本地路径( localhost 与 127.0.0.1 )
# If ture, ignore localhost & 127.0.0.1
ignore_local: true

(8)更改网站背景图片(NexT)

  在\source_data\style.styl(如若不存在则创建,并在主题配置文件中的custom设置项取消相应的注释),将背景图片background.png放入自定义文件夹\blog\source\uploads(若不存在则创建)中,并在style.styl文件中增加如下内容:

1
2
3
4
5
6
7
8
9
// background
body {
background-image:url(../uploads/background.png);
height:100%;
width:100%;
background-repeat:repeat-x;
background-attachment:fixed;
background-size:100% 100%;
}

2. 功能配置

(1)启用独立的主题配置文件,以便后续NexT主题的升级(NexT,Fluid)

  在目录下新建_config.hexo-theme-next.yml,将\blog\themes\hexo-theme-next目录下的主题配置文件_config.yml中的内容全部复制到_config.hexo-theme-next.yml中,后续修改_config.hexo-theme-next.yml文件内容进行主题配置即可。

  在目录下新建_config.fluid.yml,将\blog\themes\fluid目录下的主题配置文件_config.yml中的内容全部复制到_config.fluid.yml中,后续修改_config.fluid.yml文件内容进行主题配置即可。

3. 警告错误解决

(1)在部署完进行网站预览时,命令行窗口警告提示

1
2
3
4
5
6
(node:87224) Warning: Accessing non-existent property 'lineno' of module exports inside circular dependency (Use `node --trace-warnings ...` to show where the warning was created)accessing-non-existent-property-lineno-of-module-exports-inside-circu)
(node:87224) Warning: Accessing non-existent property 'column' of module exports inside circular dependency
(node:87224) Warning: Accessing non-existent property 'filename' of module exports inside circular dependency
(node:87224) Warning: Accessing non-existent property 'lineno' of module exports inside circular dependency
(node:87224) Warning: Accessing non-existent property 'column' of module exports inside circular dependency
(node:87224) Warning: Accessing non-existent property 'filename' of module exports inside circular dependency

  Hexo 这里的 warning是由于stylus导致的,幸运的是stylus 在 0.54.8 版本修复了这个问题,所以对于 Hexo 用户来说,更新一下hexo-renderer-stylus,就可正常使用。如若仍报错,则定位到\blog\node_modules\nib目录中执行npm update stylus更新stylus,解决过程中可能用到下列命令:

1
npm update hexo-renderer-stylus # 在\blog目录下执行更新hexo-renderer-stylus
1
2
3
npm update stylus # 在\blog\node_modules\nib目录下执行更新stylus
npm uninstall stylus # nib卸载stylus
npm install stylus # nib安装stylus

(2)点击目录链接不跳转解决办法(Hexo版本: "6.0.0",hexo-theme-next版本: "8.10.0")(NexT)

  进入 _modules-toc.js 文件中,把 28 行~31 行修改为:

1
2
3
4
$title.attr('id', id);
// $title.children('a').remove();
// $title.html( '<span id="' + id + '">' + $title.html() + '' );
// $title.removeAttr('id');

(3)Hexo部署出现错误err: Error: Spawn failed解决方式

  进入站点根目录,删除 git 提交内容文件夹

1
rm -rf .deploy_git/

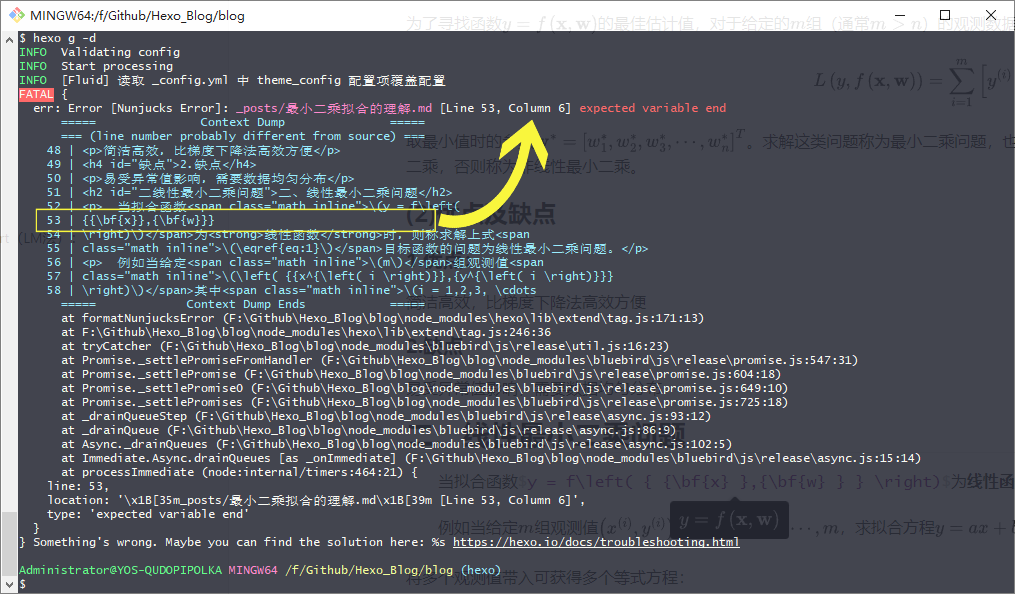
(4)Hexo部署出现错误Error [Nunjucks Error]: expected variable end:错误位置定位

  Hexo使用Nunjucks渲染转义内容 。用{{ }}{%`、`%}包装的内容将被解析,并可能导致问题。您可以使用原始标签插件将敏感内容包含起来。找到正文里面{{`、`}}{%`、`%}这样的语句,主要是公式内容,作如下修改:

若是行内公式则将{{`、`}}用空格进行间隔开:{ {} }

若是段外公式则在公式首尾加入如下内容,并且进入源码模式,检查确认段外公式最后留出一行空行(保证公式显示正确):

1
2
3
$${% raw %}
公式内容
$${% endraw %}

定位错误位置:

错误位置定位

4. 文章编辑

(1)利用typora编辑Hexo博客

  通过typora对发布在Hexo上的文章进行编辑,遇到需要加粗文字以及添加背景色时,使用如下代码:

1
<b> 加粗-背景色-文字 </b>

(2)取消NexT主题侧边栏中目录的自动编号(NexT)

​ 打开主题配置文件,查找 toc 选项,设置 number 选项为 false,内容如下:

1
2
3
4
5
6
7
8
9
10
11
12
# Table of Contents in the Sidebar
# Front-matter variable (nonsupport wrap expand_all).
toc:
enable: true
# Automatically add list number to toc.
number: false
# If true, all words will placed on next lines if header width longer then sidebar width.
wrap: false
# If true, all level of TOC in a post will be displayed, rather than the activated part of it.
expand_all: true
# Maximum heading depth of generated toc.
max_depth: 6

(3)文章段落首行缩进(NexT)

  首先进入电脑设置,找到键盘语言选项,打开半角/圆角切换按键功能,切换至全角模式并在段落开头键入两个空格即为缩进两个字符,使用tab键并无效果,使用全角空格缩进效果如下:(这一问题貌似在更换mathjax渲染引擎时解决了???)

  首行缩进两个字符;

   首行缩进3个字符;

    首行缩进4个字符;

  Fluid主题下使用&emsp;即可。

(4)为文章在网站上显示添加Read More按钮(NexT)

  在文章中任意位置插入<!--more-->,在此之后的内容将被折叠隐藏。

(5)数学公式显示(NexT,Fluid)

  参考NexT主题官方教程Math Equations | NexT (theme-next.js.org),首先将站点配置文件中的mathjax项开启,如下所示

1
2
3
4
mathjax:
enable: true
# Available values: none | ams | all
tags: none

然后安装公式渲染引擎hexo-renderer-pandoc,安装此插件前还需要安装pandoc,以及卸载掉其他渲染引擎,可能会用到如下命令:

1
npm uninstall hexo-renderer-marked
1
npm uninstall hexo-renderer-kramed
1
npm uninstall hexo-renderer-markdown-it

最后重启电脑,即可正确安装pandoc以及使用公式渲染引擎插件,效果如下:

  行内公式测试

  行间公式:

NexT主题下文章内公式渲染使用教程链接:Math Equations | NexT (theme-next.js.org)

Fluid主题下文章内公式渲染使用教程链接:配置指南 | Hexo Fluid 用户手册 (fluid-dev.com)

  将复制Mathtype公式至Markdown中,首先将Mathtype预置中的剪切和复制预置设置为Latex2.0.9 and Later,并且注意公式中的{{`和`}}符号,之间一定要加上空格将其分开,否则公式显示不正确。

(6)图片双caption渲染问题(Fluid)

图片会出现双标题显示的问题,在站点配置文件中加入

1
2
3
4
# 解决图片重复双标题显示的问题
pandoc:
extensions:
- '-implicit_figures'

(7)MathJax公式渲染编号显示问题

在Hexo中渲染MathJax数学公式 - 星空str - 博客园 (cnblogs.com) 使用\label{eq:1}和\tag{1}给公式打标签和编号以及使用$\eqref{eq:1}$实现跳转索

(8)文章内容段落间距、文字间距设置

通过hexo-fluid的自定义custom.css进行修改设置,文件位于\themes\fluid\source\css若无此文件则新建一个,文件内容如下:

1
2
3
4
5
6
7
8
9
10
11
12
13
14
15
16
17
18
19
20
21
22
23
24
25
26
/*INFO 段落行间距设置*/
.post-content p {
letter-spacing:2px; /*文字间距为*/
line-height: 2.5; /*行间距为字体大小的2.5倍*/
margin-top: 0px; /*段前距离*/
margin-bottom: 0px; /*段后距离*/
text-align: justify; /*文本对齐方式*/
}

/*INFO 下划线设置*/
.post-content hr {
height: 1px; /*将高度设为0*/
margin: 10px 0; /*设置间距*/
}

/*INFO 内容里列表*/
.post-content li {
margin-top: 15px;
margin-bottom: 15px;
}

/*INFO 内容里列表*/
.post-content ol {
margin-top: 0px;
margin-bottom: 0px;
}

然后在_config_fluid.yml文件中的custom_css项添加文件路径:

1
2
3
4
5
# 指定自定义 .css 文件路径,用法和 custom_js 相同
# The usage is the same as custom_js
custom_css:
- /css/indeximg-hover.css # 文章索引封面悬浮放大
- /css/custom.css # 文章段落

(9)文章内图片并排显示

参考:Guide | Hexo Fluid Docs (fluid-dev.github.io)中的Group Images描述,为方便在markdown中预览图片,采用html方式预览,不影响渲染。

1
2
3
4
5
6
7
8
{% gi total n1-n2-... %}
<p align="center">
<img src="url" width="400" alt = "图片1"/>
<img src="url" width="400" alt = "图片2"/>
<img src="url" width="300" alt = "图片3"/>
<img src="url" width="300" alt = "图片4"/>
</p>
{% endgi %}

total:图片总数 n1-n2-... :每行中的图片数

图片1
图片2
图片3
图片4